Monday, November 30, 2015

PERSONALIZED UGLY CHRISTMAS SWEATER PARTY FAVORS

We're officially gearing up for all those UGLY SWEATER PARTIES this holiday season and today I've teamed up with an awesome group of bloggers to give you tons of Ugly Sweater Party Ideas + a giveaway to Target to help YOU get a head start on your holiday shopping!!

13 Ugly Sweater Party Ideas from top bloggers

Check out my tutorial below, then check out what my other blogging friends came up with for their Ugly Sweater Party Ideas this holiday season!! And don't forget to enter the giveaway for $130 in COLD HARD CASH below!!

Now, on to my project!


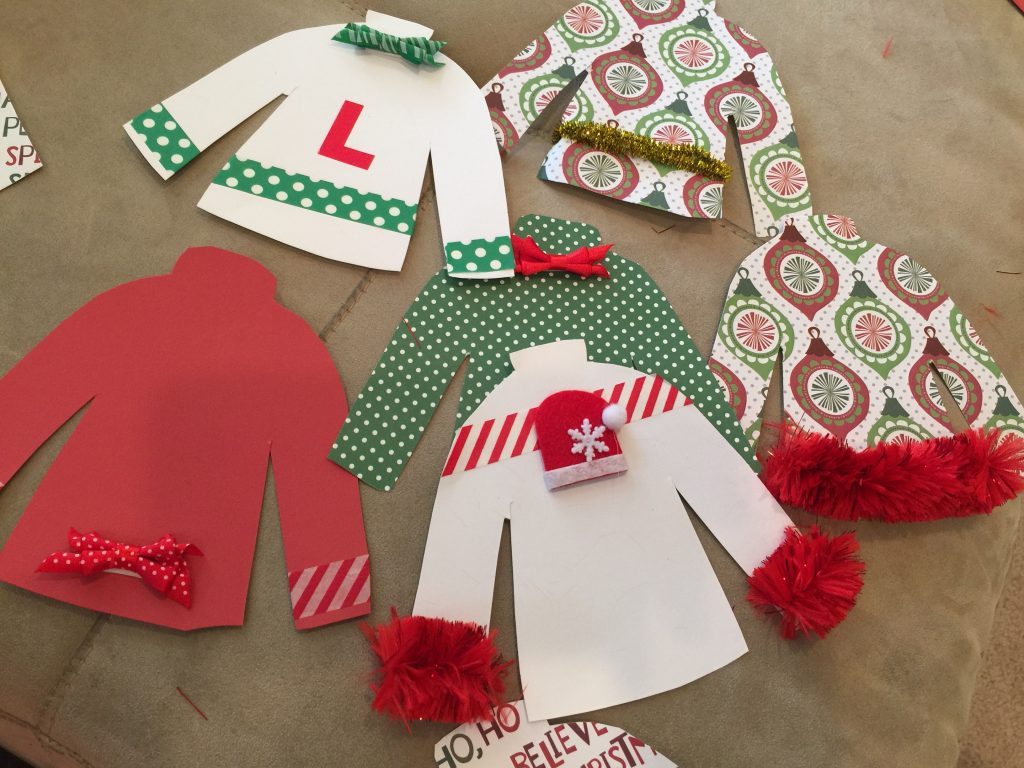
1.)  Draw a sweater pattern on plain paper.  I always draw my patterns, fold them in half, then cut them out, so that my image is symmetrical.


2.)  Trace sweater pattern onto Kunin Eco-fi® ClassicFelt   Craft Cuts in Neon Green, Pirate Green and Coral Red with Aquarellable pencil by Stabilo.  Writes on any surface and is great for felt!  Cut out sweaters with scissors.


3.)  Decorate with bits of felt, sequins and rhinestones.  Attach decorations with Aleene's® Easy Squeeze Original Tacky Glue from I Love to Create.  


4.)  Embellish your sweaters with Tulip® Dimensional Fabric Paint Colors in Bright Red, Lectric Lime, White and Leaf Green.  Draw on names, let dry.

Use your Personalized Ugly Christmas Sweaters as Place Cards and Party Favors for your Guests!  These would also be cute to use as gift tags on wrapped presents or ornaments on your tree.

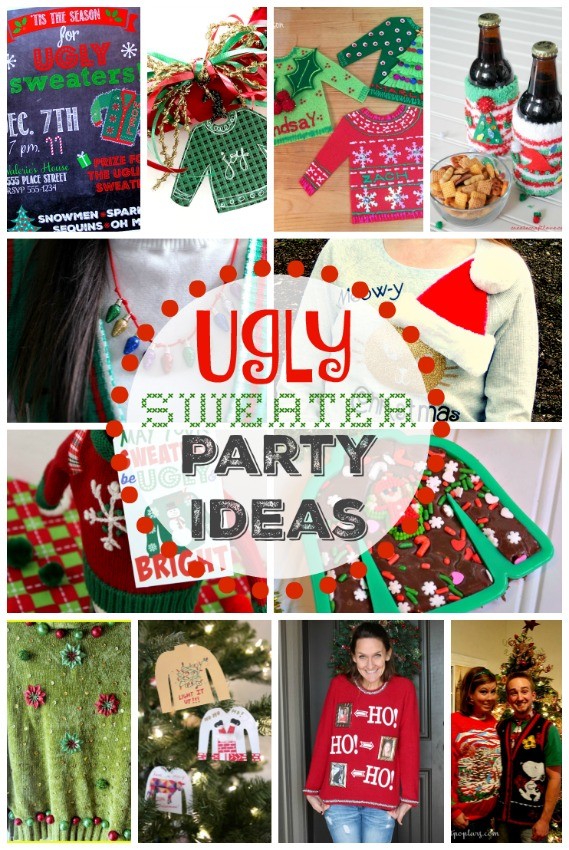
Now check out all the inspiration from my crafty blogger friends!

ugly sweater fudge
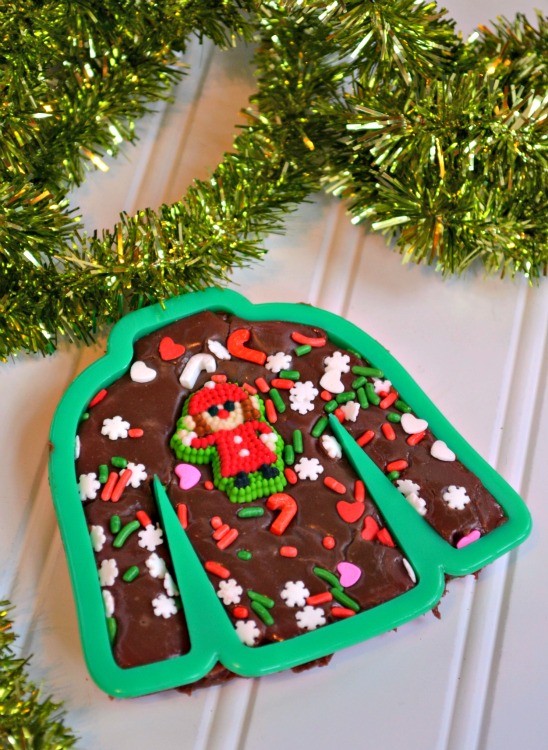
Ugly Sweater Fudge Favors from The Cards We Drew

ugly christmas sweater coozies
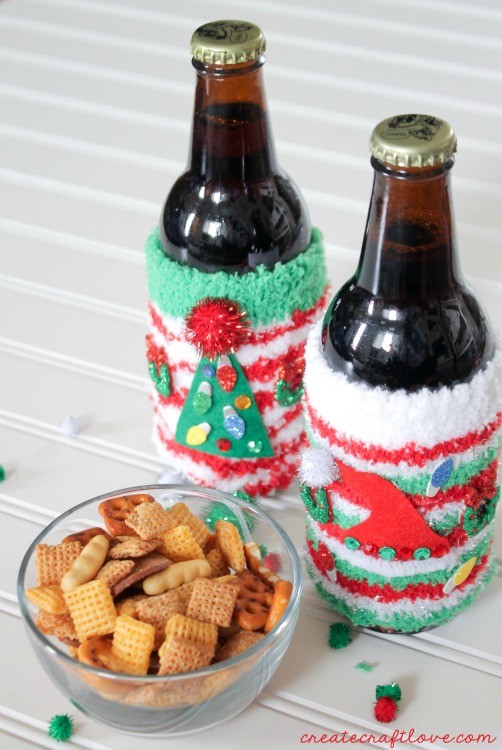
Ugly Sweater Coozies from Create Craft Love


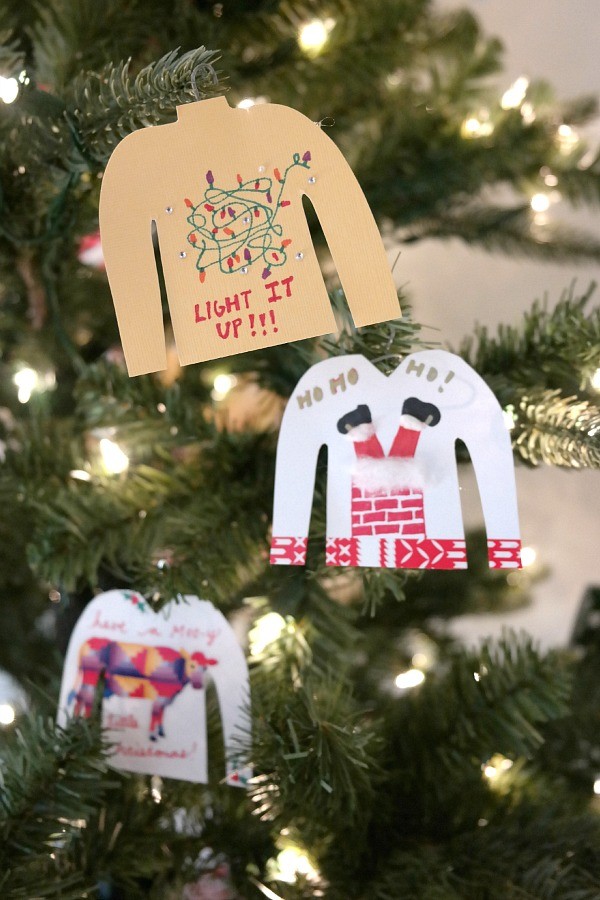
Ugly Sweater Ornaments from CRAFT

meowy-christmas-sweater
Meowy Christmas Ugly Sweater Idea from Crafting in the Rain

IMG_6002(1)
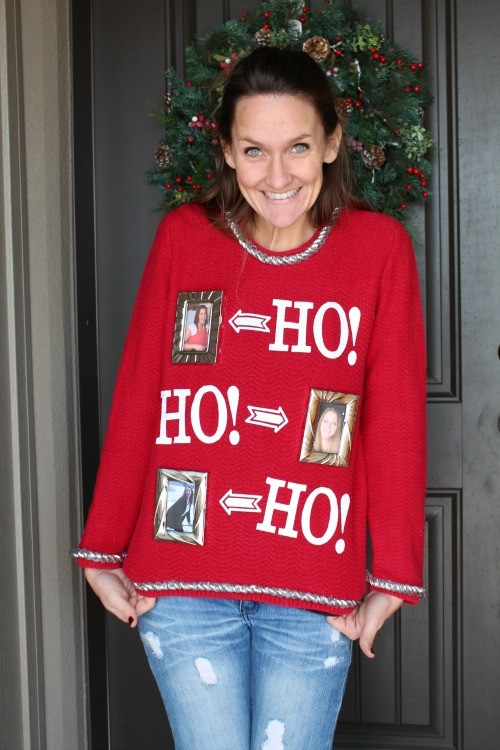
Ho Ho Ho Ugly Sweater from A Girl and a Glue Gun

Ugly-Sweater-Wreath-Jen-Goode
Ugly Sweater Wreath from 100 Directions

Free Ugly Sweater Gift Tag Printable OHMY-CREATIVE.COM 2
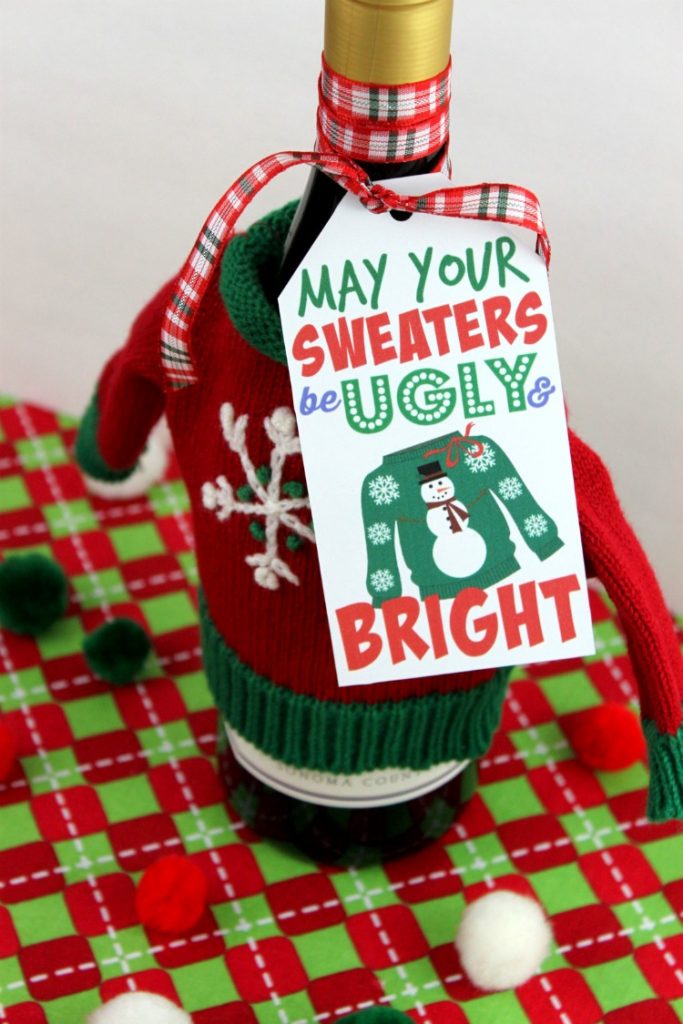
Ugly Sweater Gift Tag from Oh My Creative

Ugly Green Sweater
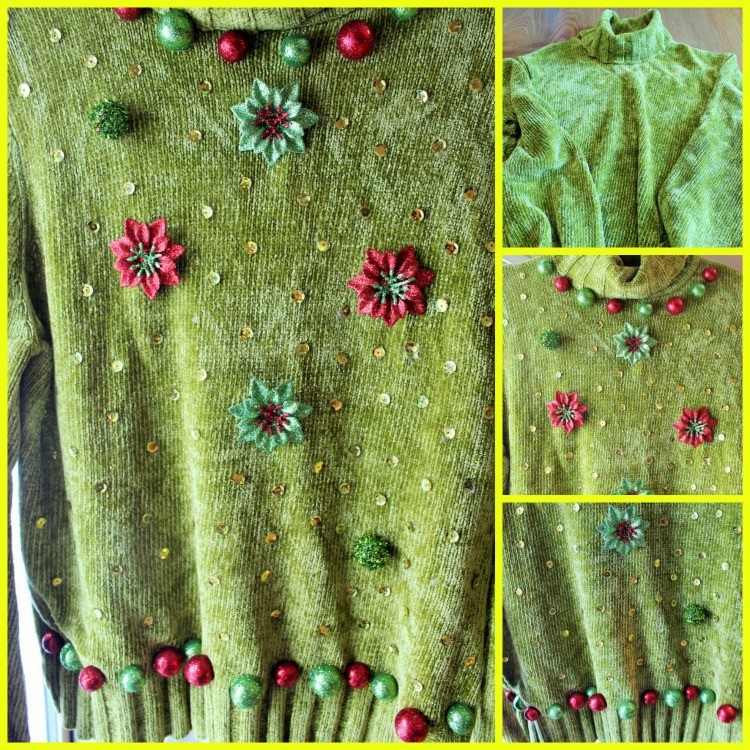
DIY Ugly Green Christmas Sweater from This Scattered Life

PERSONALIZED UGLY CHRISTMAS SWEATER MAIN 1
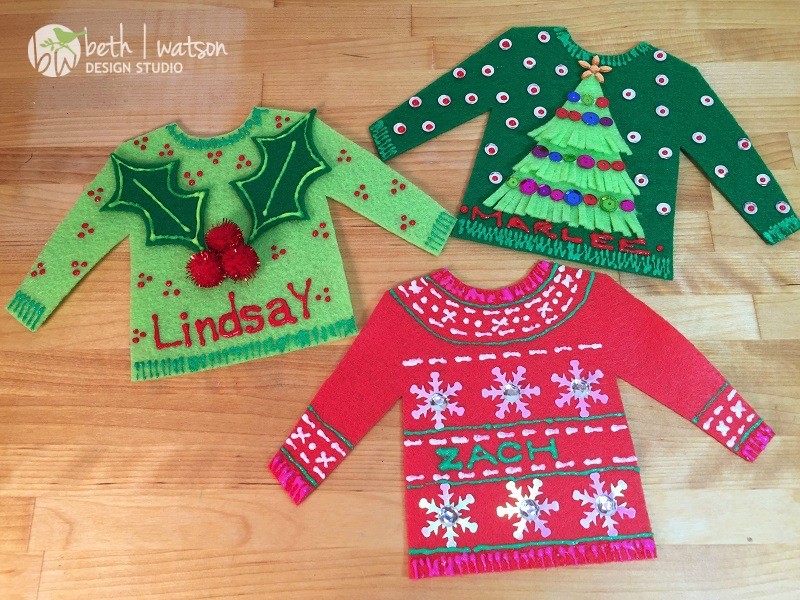
Personalized Ugly Christmas Sweaters from Beth Watson Design Studio

image1
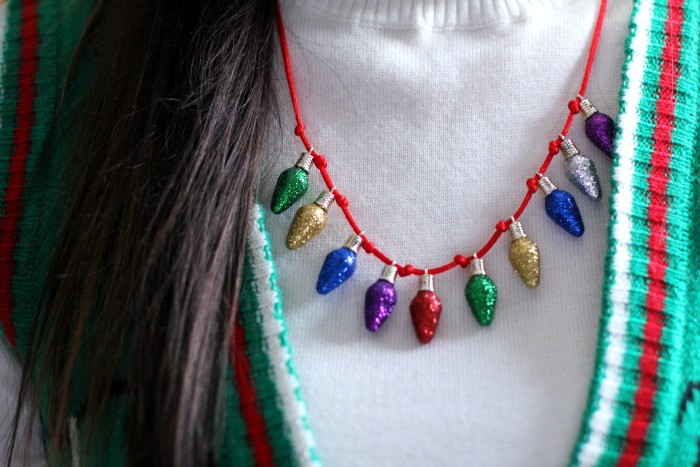
Ugly Sweater Necklace from Just Between Friends

Ugly Sweater Invite Square
Ugly Sweater Invitations from Occasionally Crafty

378884_2803466203961_1711806982_n
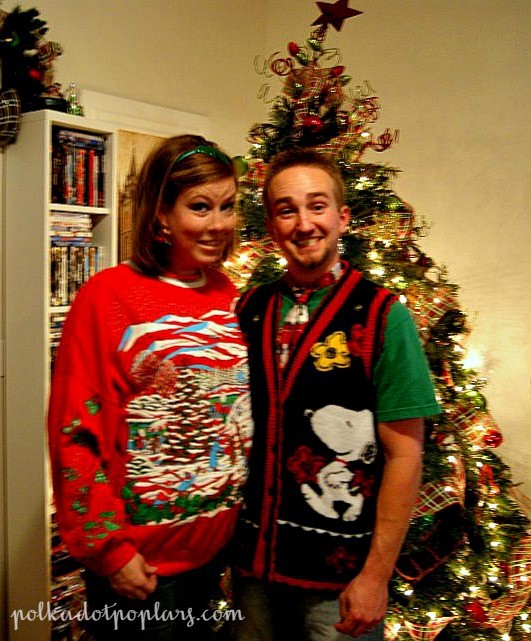
Ugly Sweater Contest and Awards from Polka Dot Poplars

image
Ugly Sweater Decorations from Organized Island

Giveaway rules: Giveaway runs from Monday, November 30th through December 7th at midnight. Winner will be selected by Rafflecopter and notified via email from thecardswedrew@yahoo.com of their winnings. Winner must have a valid PayPal account to claim cash. Winner has 48 hours to respond via email to claim prize otherwise new winner will be selected. The bloggers involved are not responsible for notifications that go to spam or that aren't claimed in time. Pinterest, Facebook, and Instagram are not associated with this giveaway and are in no way held responsible. All winning entries will be verified and if not complete, the entry is VOID and another winner is selected. Open to anyone with a valid PayPal account.

a Rafflecopter giveaway

Thanks for stopping by!  -Beth

Wednesday, November 11, 2015

Faux Christmas Cookie Ornaments

Happy Wednesday everyone!  Up on the blog today is a fun hop called Craft Lightning Holiday Edition - everything is made in 15 minutes or less! How fun is that?  It is hosted by The Country Chic Cottage, 30 Minute Crafts and co-host Aunt Peaches.

One thing that I always have time for is Christmas Ornaments!  All shapes, sizes and colors - the options are endless!  Today I am featuring these Faux Christmas Cookie ornaments!  Made from craft foam and three dimensional fabric paint - they are QUICK, EASY and CUTE!  A great craft to make with the kiddos and the cost of the supplies won't break the bank either.

Faux Christmas Cookie Ornaments


Here is what you will need:


Here is how to make it:


1.)  Trace cookie cutter shapes onto craft foam.  Cut out with scissors.  Distress edges of cookies with Colorbox® Crafter's Ink by Ann Butler in Bark.  This gives your cookies that "just baked" look!


2.)  "Frost" cookies with Tulip® Dimensional Fabric Paint in True Red and White.  Accent with silver beads, sprinkle with clear chunky glitter and let dry.


3.) Embellish with Tulip® Dimensional Fabric Paint in Pistachio, let dry.

4.) Attach 8" length of gold cord to back of each cookie with  Aleene's® Original Tacky Glue®, let dry.

Now, here is the FUN part - click on the Craft Lightning button below and hop around to see what inspiration has been created!

Saturday, November 7, 2015

Handmade Holidays 2015 Blog Hop Keepsake PalletTree


Welcome to Day 2 of the 5th Annual Handmade Holidays Blog Hop!  

I am excited to be participating with this awesome group of creative friends that will inspire you with great gift ideas for the Holiday season!

As my Mom and Dad get older, the gifts that mean the most to them are keepsake gifts, so I have decorated this Pallet Tree with cherished photos of Christmases Past.  It was a fun walk down memory lane and I know my parents, siblings, nieces and nephews will get a kick out of the "vintage" photos.  Good times!


Now on to my project!

1.)  Stain the Pallet Tree by misting with water and applying Crafter's Ink in Limelight, Evergreen and Deep Woods over entire surface, sides and back.  Start with darkest color and end with lightest color.  Apply a second coat and re-ink pads, if necessary.  Let dry.  Stain trunk with Crafter's Ink in Bark.


2.) Mist wood again with water and allow the inks to bleed and seep into all of the nooks and crannies of the rough wood surface.  Blend in Limelight Crafter's Ink Refill on Colorbox Stylus with circle tip and stamp on surface of Pallet Tree.  Fill in edges using Stylus loaded with Evergreen and Deep Woods Crafter's Ink Refills.


3.) Color mini clothes pins with Tombow Dual Brush Pen in Crimson.  I love the Dual Brush Pens for quick projects, as they cover a variety of surfaces well and dry instantly.


4.)  Attach clothes pins to Pallet Tree with Tombow MONO Multi Liquid Glue, let dry.


5.)  Decorate your Pallet Tree with lines dots and squiggles of Tombow MONO Multi Liquid Glue.  Draw on, let dry to clear, then apply Colorbox Designer Foils.  The MONO Multi Liquid glue does not dry completely, but rather remains tacky which makes a perfect base for Designer Foils to adhere to.


6.)  Copy, trim and attach vintage Christmas photos to clothes pins.


Display your Pallet Tree and ENJOY the smiles that all of these wonderful memories bring to you and your family!

Side note:  I have to say that I was not at all sure how this technique would turn out, but I am so incredibly pleased with the results!  Misting the inks with water blended them together like butter and gave the piece such depth.  I LOVE IT and will definitely use this technique again!  Just make sure you leave plenty of drying time (at least over night).

Products and Materials Used:
Clearsnap® ColorBox Crafter's® by Ann Butler Inks and Refills - Limelight, Evergreen, Deep Woods and Bark
Clearsnap® ColorBox Designer Foils - Goldmine, Silver Fog and Lucky Penny
Clearsnap® ColorBox Stylus and Tips - Circle Tip and Oval Tip
Color Copies of Christmas Photos, Water Mister, Scissors, Pencil, Ruler, Paper Trimmer, Mini Clothes Pins (8).

Now on to the really FUN STUFF - PRIZES!!  Tombow USA is giving away a  great package of prizes, featuring Dual Brush Pens and Adhesives!  Enter through the Rafflecopter widget below from November 6th until November 15th!


a Rafflecopter giveaway

And EVEN MORE PRIZES!! The Handmade Holidays Blog Hop is having a giveaway of over $600 (Yes, I said $600, just look at the photo below!) in craft supplies to help you make this holiday handmade. Enter to win using the Rafflecopter widget below:

a Rafflecopter giveaway


A BIG THANK YOU to all of our sponsors!


Thanks for stopping by! -Beth

Tuesday, November 3, 2015

5 Thankful Projects Round-Up

It's the first Monday in November, so it is time for the Designer Crafts Connection blog hop!

This months theme is Thank You cards and gifts.  I am not much of a card maker, so I wanted to share 5 of my all time favorite "Thankful" Thank You gifts - great to make and give as a Hostess Gift for Thanksgiving - and easy enough to make with the kiddos!


First up is the Thankful Turkey Mason Jar Craft  Each family member writes a note about what they are thankful for and places it in the jar!


Second is the Thankful Banner  Scrapbook paper leaves are stitched together and each family member can write a note about what they are thankful for on each leaf!


Third is the Turkey Shelf Sitter.  A clay pot, wooden head, some fabric and felt come together to create this quick and easy craft you can make with your kids!


Fourth is the Turkey Place Cards   Made with scrapbook paper and punches, then embellished with googly eyes, chenille stems and rick rack!


Fifth is the Turkey Shelf Sitter.  Made from wooden pieces, stamped cardstock, some paint and tons of imagination!

I hope that you enjoyed my projects and they will inspire you to create cute Thank You gifts during this Thanksgiving season!

Now it is time to HOP around to see what THANKFUL CARDS & GIFTS the other Designers have created!  Just click HOP FORWARD and HOP BACK links in the Designer Crafts Connection navigation tool on the right hand side of my blog!

Thanks for stopping by!  -Beth